Showing posts with label DIY. Show all posts

Wednesday, March 27

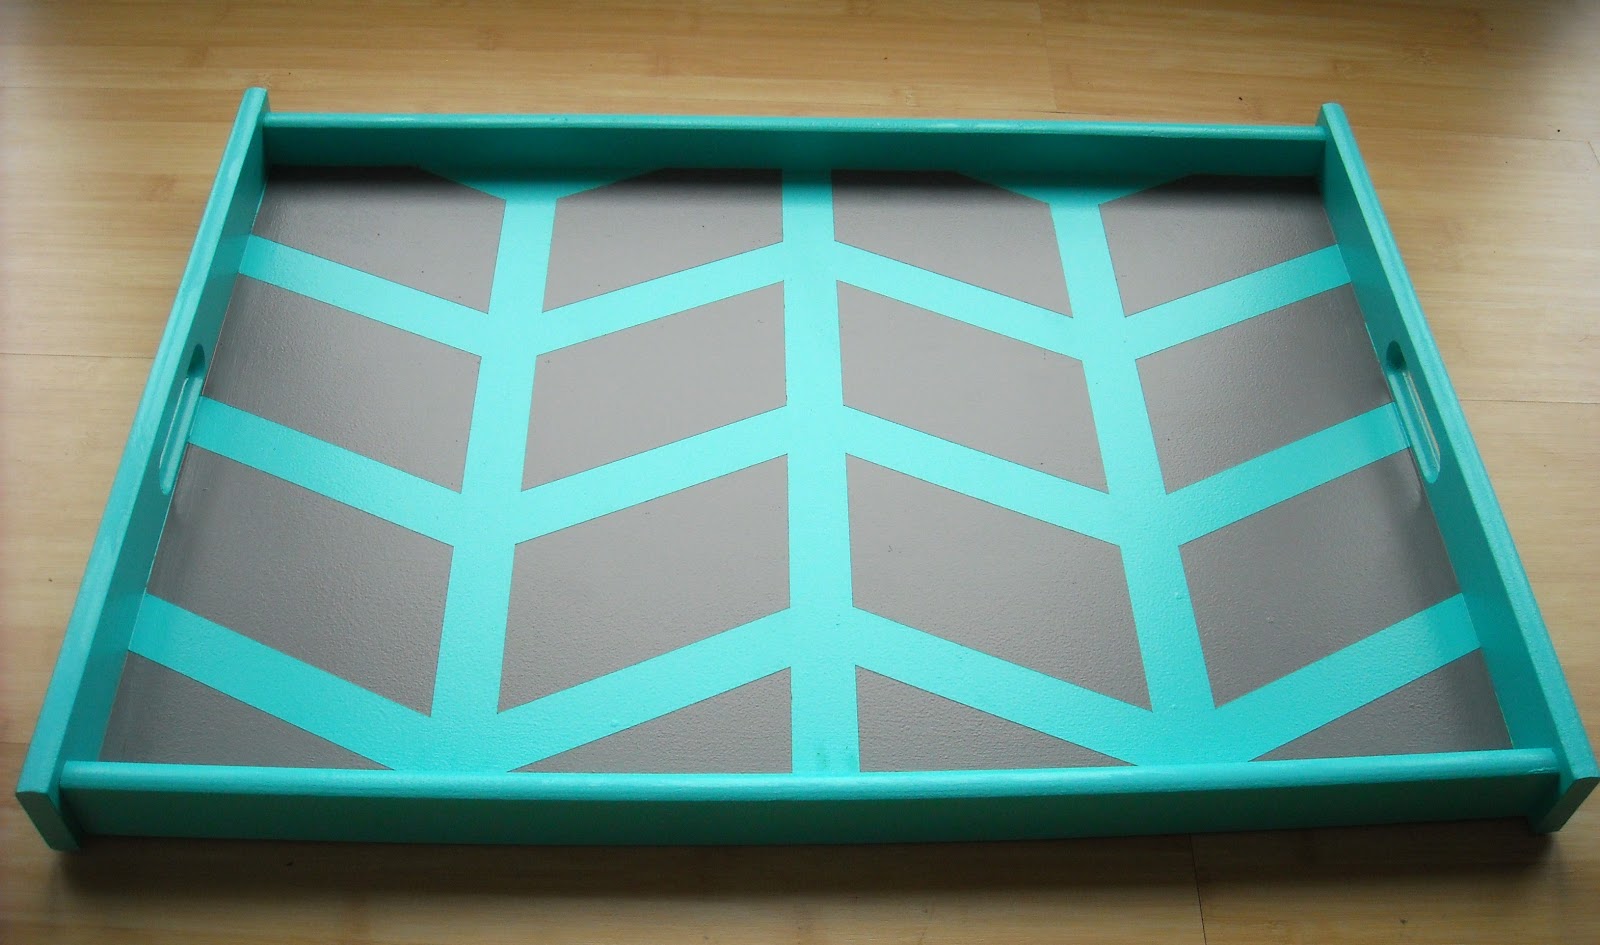
Herringbone Tray


In Kandern there is one day a year where the residents are allowed to put their unwanted household items on the curb for the city to pick up and take to the dump. This day is called Sperrmüll. It happened on February 27th and I scored quite a few treasures thanks to the hubs. One of those treasures is this tray. 


Ok, so she doesn't look like a treasure with those unsightly flowers but with a little paint and tape she became one.

I have been wanting to try a herringbone design but I felt a little intimidated by the need for measuring and precise symmetry. With a small item like this tray, the task seemed less daunting. So, I gave it a go.


The taping part of this project took me about an hour and a half. I used the advice from this tutorial at Design*Sponge to help me with the process. After all the taping was done, I sealed the tape by running over it with the edge of my credit card and painting over the edges of the tape with the base color, turquoise. Once that was dry, I painted the first coat of grey and it took 2 more light coats. There was a little bleeding under the tape once it was removed. However, those spots were easily touched up with a small paintbrush.


The time spent with measuring and taping to get this symmetry was well worth it.


Also, something new for me since I've moved to Germany is using acrylic paint instead of latex. I've been testing it on a few different projects and I find that it's easy to work with. The only con with acrylic is if you apply more than 2 coats, it starts to get really bumpy.  Sanding between coats has become a must and I hate sanding. However, the pro is that the worker at the local paint shop said no protective top coat is needed on furniture as long as you prime the furniture before applying the acrylic. I'm skeptical about this tip but I'm testing it on a chair now. We will see.

Here are the Before & After shots:


Enjoy!


Saturday, July 28

Coral Striped Headboard

This is a simple headboard that I painted grey with a coral stripe down the center.
I've never used stripes on furniture before and I was a little hesitant to try. I just used regular blue painter's tape (not the expensive stuff). I painted the coral in the middle. Taped off the sides. Sealed the tape with the coral color and then painted the grey. After a few coats and a couple of days I peeled off the tape and I had a perfectly crisp line.  Easy Peasy!

The paint colors are Behr's Creek Bend and Youthful Coral. I just purchased the testers for $3 at Home Depot. 

You can find this piece for sale in my Etsy Shop. 


Monday, January 2

Jaded Nightstand

Kicked to the curb. Tossed to the side. Left for dead. Dumped. This nightstand was jaded to say the least. Left at the dumpster by her previous owner, understandably so, due to her sad yellow finish chipping away at her seams. This ol' gal needed a make over. So, I gave her a frosted one in jade. This is the same color I used on my living room walls and I love it. It's called Frosted Jade (how appropriate) by Behr. However, I had it color matched to Olympic paint. It's cheaper and less fumes.


I like how it turned out and the original hardware adds a nice contrast with a tarnished aged look.


It's for sale in my Etsy shop, The Maison. Have a look!


Friday, October 28

Almost Navy & Vintage Gold Side Table

My husband found this table abandoned next to a dumpster. It was in good condition and it had great curves so he brought it home to me. I sanded it down and originally started to paint it grey but after the first coat I didn't like how the grey was turning out. I found this deep blue green paint that reminds me of navy blue but is too green to be navy. It's Valspar's Farimont Penthouse Mosaic Blue.


The original finish on the top was a sandy orange stain and I liked how the tone looked with the blue. However, the top of the table had a lot of dents and scratches in it and I would've had to put a lot of elbow grease in it to sand it out. So I decided to paint it Vintage Gold Metallic by Martha Stewart. 


I put 2 coats on the top and then distressed the edges. I buffed the whole top with a fine sanding block and it created an aged look. As if I had glazed it. 


I liked the effect so I left it.


I'm going to be working on a kitchen island soon. We're moving into a house and it comes with a really awful kitchen island that the last tenants left. The landlord says I can do whatever I like with it, so I've been pinning for inspirations. I'll post pics when it's all done.


Tuesday, August 30

White Distressed Coffee Table with Turquoise Accents

I've been working on this coffee table for 2 months. She was a little stubborn but so am I...


At first I painted her a bright turquoise but it was just way too much color for this table. Then I tried white. It was OK but I wanted to see if something else would make more sense. So I dry brushed the base in a greyish turquoise. I liked the technique but I hated the way it looked. So we went back to white .

 I decided to glaze her in a silver metallic and she was beginning to show some character. However, after all the coats of paint the thin carvings on the corners were looking awful. I could see drips of paint  and runs. I turned to wood filler to remedy the problem. It was my first go at wood filler and I didn't do such an awesome job. Still, I could see the outlines of the carvings and then I thought about decoupoging.

I had this swirly craft paper that I adhered to the corners with mod podge and sealed with a clear coat. It was just the right amount of color and the swirls added a little whimsy. 

The edges of the tabletop and legs got a little distressing attention and then I applied a white wash. I like white washing (watered down white paint applied and then wiped off) because it provides a muted wood tone to the distressed areas. I finished her off with a few coats of wax and spray painted the original hardware.

After two months of trying different colors and techniques, she's finished and listed in my Etsy Shop!


It's OK to make a few mistakes especially when you can paint over them.

Friday, August 12

Pretty Little Table

I've been on the look out for a pretty little table and I finally got my hands on one!

I tried to resist painting it turquoise but...


I love it's pretty little claw feet.


And the pretty scallop detail around the top of the table.


It's just so... pretty.


You can find it for sale in my Etsy shop.

Happy Weekending!


Friday, July 1

Mason Jar Soap Dispenser

Easiest DIY ever!

Mason Jar from Michaels - $1.29

Top from a bottle of hand soap from Target - $1.47

A hammer and nail to make the hole in the top ...

... and La Ti Da! Soap Dispenser.


Friday, June 17

Don't Be So Beachy

 I'm not a fan of beach inspired decor. With that said this little nightstand is looking a little 'beachy' and I happen to like it. I guess a little beachy-ness in small doses suits me fine.

I painted this nightstand in Hallowed Hush by Behr. It's kind of greyish green aqua. It's an interesting color.

Psst! You see the frame with the pressed flowers? My husband picked those for me on a hike while he was in San Diego last month. How sweet is he?!

A little distressing goes a long way.


Less is more.


Unless its diamonds.

Saturday, March 19

Visions in My Head

The past couple of weeks I've been on a mission to find a buffet. I wanted to use it as our T.V. console, entertainment center or whatever it is that you want to call it. Well, I found one for $50. Bargain!

The hubs and I carried that 70 pounder up two flights of stairs because oh yeah we couldn't live on the first floor.  It's $200 more  a month for the same apartment that just happens to be on the first floor. The bargain shoppers that we are, we just couldn't justify paying $200 more. So, back to the point. Yes, we carried this 70 pound buffet up 2 flights of stairs.

It was quite comical. The hubs is 6'5" and I'm 5'5" and I'm not necessarily what you would call strong in the physical sense. Up the first flight we tried flipping it over and over again until we reached the second floor landing. Then the second flight of stairs we did a little by little, inch by inch, pick up put down method. Anyways, we made it to the third floor and into our apartment exhausted but no injuries.

I was so excited about this buffet that I couldn't wait to tackle it. I started sanding it the very next day. The second day I put 2 coats of paint on it. The third day a third coat and 2 coats of stain. By the fourth day it was finished and I stood, head cocked sideways, staring and thinking, I'm not sure this is what I envisioned.

Convinced, however, that once we got it inside and the T.V. on it and the decor around it I would see that it was in fact what I had envisioned in my head.

Wrong!

The hubs and I lugged it into our living room and he put the T.V. on top of it. Again, I stood, head cocked sideways, staring and thinking, No, this is definitely NOT what I envisioned! Darn it!

It was all wrong. All wrong! Ugh! I just spent 3 days making it into what I thought I wanted and it was not at all what I wanted.

First, lets start with the paint choice. I chose white because I recently added some white decor to the living room and I thought it would tie in nicely with that. Also, I thought it would brighten up the space. Next, I chose a mahogany stain. What you need to know about me is that I've never stained before. This was my first go at it. I don't know a lot about staining except what I read on the back of the can. However, it was relatively very easy and it seems like it would be difficult to really mess up. My only problem with this particular stain was that it was way more red than brown. I was looking for brown. Even though on the can it had a picture of the color it was and it looked like a dark brown with a hint of red which is what my coffee table and end tables are. Needless to say, this red wood was not matching with my  space at all.

Still determined to try to make it work I decorated it. Put all our DVDs and games in it. And, as the hubs told me to do, I let it marinade for the night.

As I was watching T.V. I knew that it was just wrong for our living room. It didn't fit. It didn't work and I could try to force it but I was not going to be happy with it.

So, the next day, the hubs and I AGAIN moved it and brought our old entertainment center back to its spot.

I was disappointed. I really thought it would be awesome but it wasn't.

Here's where this story takes a turn. I decided to put it in my Etsy Shop. Within the first hour it already had 21 views. Which, for me, is a lot. Some items can take days to get 21 views. Anyways, within 2 hours someone was emailing me telling me it was exactly what they were looking for and really wanted to buy it. I was ecstatic! This would be the first time I sold a piece of furniture on Etsy. Yes, I've sold a few things on Craigslist but not furniture that I put a lot of time and love into like this one.

Now, time to ship this 70 pounder! Uh oh...

Here are before and after shots and a link to my inspiration which was by Perfectly Imperfect (Awesome!). Have a look~see!
Before... Bleh!

After


Saturday, March 12

Paint It This Not That Results

And the winner is...    drum roll, please...    Turquoise!

Ayyo! (exclamation courtesy of Andy Bernard from The Office)

Which makes me very happy since it's always my favorite. I'll be working on sanding the headboard this weekend and I will get pictures up as soon as it's painted.

Happy Weekend!

Saturday, February 19

Repurposed

I found arms to a vanity mirror at a second-hand furniture store. They had a fun shape and there was already a piece of wood screwed into the back of one with a little hook... I'm guessing the previous owner had the same idea.

All I had to do was distress them with sandpaper and spray a clear coat to give them some shine. Then I screwed the piece of wood into the other arm.

And abracadabra...instant wall art!

Tuesday, February 8

Crushing on a Lamp


Since my husband stole me away from my single life a year and half ago my only crushes (besides the one I have on my hubs) have been on home decor. I'd like to introduce you to my current crush.


Don't mind her she's just being Modest. ;)

I found her at the flea market and I basically stole her from the seller. It was the end of the day  and the seller dropped the price 40%.
Here's a negotiating tip and something to keep in mind when buying old lamps. First, ask what the price is and then always ask if the lamp works. The seller knows that it's risky for you to purchase the lamp if it doesn't work. They will almost always drop the price for you to take some of the risk out of the purchase. Also, always, Always, ALWAYS go at the end of the day on the last day. 30 minutes before they close is best. Use 20 minutes to scout out the items you want and then return to buy when there's about 10 to 5 minutes left. You will get the best price possible this way. Sellers at flea markets want to sell and they will drop their prices dramatically at the end of the day.

I liked that this old lamp had interesting glass, was in good shape, had little crystals drizzled about the leafy bobeche, and it came with a lamp shade.


So, I headed to Joann Fabrics to get inspired by some fabric for the shade. I found this floral pattern. It's something I've had my eye on for a while and this was the perfect project for it. Plus, I already have coordinating paint.


I painted all the brass parts of the lamp Norway Aqua by ColorPlace. The same color I painted my Armoire.

Then I wrapped the fabric around the shade which was a little tricky because the bottom of the shade was wider than the top. I did a little manipulating and secured it to the shade with hot glue. Also, I added a grey ribbon for trim on the top and the bottom.

Ooh La La!